


If you're involved in programming and development or have a passion for computers, chances are you're familiar with the term "frameworks." In this comprehensive series, we will embark on a deep dive into the world of frameworks, with a primary focus on the Flask Framework and its application in web development. Our objective is to explore Flask step by step, equipping ourselves with the knowledge needed to create web applications. Throughout this series, we will also incorporate additional components such as HTML, CSS, and JavaScript. By the end of this journey, we will have built a simple yet functional web application using Flask.
Join us as we unravel the capabilities of Flask and gain practical experience in creating web applications. Together, we will explore the framework's features, tools, and components and learn how to integrate HTML, CSS, and JavaScript into our Flask projects. Through a progressive approach, we aim to provide a comprehensive understanding of Flask, empowering you to confidently develop your web applications.
Let's embark on this exciting journey and unlock the potential of Flask in the realm of web development!
What is a Framework?
In simple terms, a framework can be likened to a prebuilt structure that simplifies and streamlines the process of building software or applications. It provides developers with a set of tools, rules, and guidelines, offering a solid foundation to begin their development journey. Instead of starting from scratch, a framework allows developers to leverage existing components, libraries, and predefined code, accelerating the development process and enabling them to achieve their desired outcomes more efficiently.
To illustrate, imagine you want to build your dream house. Rather than starting from the foundation and constructing every aspect from scratch, what if there was already a partially built structure that you could modify and enhance to meet your specific requirements? A framework functions in a similar way in software development. It offers a structured starting point, incorporating libraries, codes, and predefined functionalities that developers can build upon, saving time and effort while achieving their desired result.
Why do we use Frameworks?
Now that you understand what a framework is and its role in software engineering, it's clear why developers prefer using frameworks over starting from scratch.
If you are still unfamiliar with the reasons why frameworks are widely used in software development, consider the following key benefits:
Using a framework saves you time and effort because it takes care of the repetitive and boilerplate parts of development, allowing you to focus on the unique aspects of your application.
It provides a consistent way of organizing your code, enforcing good practices, and promoting code reuse.
Additionally, frameworks often come with a community of developers who contribute to their improvement, offer support, and share knowledge, making it easier to find resources and solutions to common problems.
Categories of Frameworks
Frameworks can be categorized based on their applications. Some of the commonly used framework categories include:
Web Frameworks: Web frameworks are designed specifically for building web applications. They provide tools and libraries for handling HTTP requests, routing, templating, database integration, and other web-related tasks. Examples include Flask (Python), Django (Python), Ruby on Rails (Ruby), and Express.js (JavaScript).
Application Frameworks: Application frameworks are broader in scope and provide a foundation for building various types of applications, not just web applications. They often include features such as user interface components, data handling, and business logic. Examples include Java Spring (Java), .NET Framework (C#), and Laravel (PHP).
Mobile Frameworks: Mobile frameworks are used for developing mobile applications for platforms like iOS and Android. They provide tools and libraries for building user interfaces, handling device-specific features, and interacting with native APIs. Examples include React Native (JavaScript), Flutter (Dart), and Xamarin (C#).
Game Development Frameworks: Game development frameworks provide tools and libraries for building video games. They often include features for rendering graphics, handling game physics, managing game assets, and handling user input. Examples include Unity (C#), Unreal Engine (C++), and Phaser (JavaScript).
Enough of the word “Framework”, Let’s get into the reason for this series. Flask!
What is a flask?
Flask is a lightweight and flexible Python web framework for creating web applications. It follows the Model-View-Controller (MVC) architecture but does not impose strict adherence. Additionally, Flask is not tied to a specific database or Object-Relational Mapping (ORM), providing developers with the freedom to choose according to their preferences and needs.
Why Flask?
Developers are drawn to Flask for web application development due to its lightweight nature, simplicity, and flexibility. With a small codebase, Flask is easy to grasp and navigate, making it an attractive choice. It empowers developers by offering them the freedom to make decisions based on their application's requirements. Most importantly, Flask is renowned for its beginner-friendly learning curve, which will be further explored in the upcoming articles of this series. So, stay tuned and get ready to dive into the world of Flask!
Installing Flask on your Machine
Before utilizing Flask, it is necessary to install the Flask application on our chosen environment or machine. The installation process includes obtaining Flask's dependencies, which provide essential libraries to enhance the efficiency and suitability of our Flask application for the software development task at hand.
How to install flask
REQUIREMENTS:
Before proceeding with the installation of the Flask app, ensure that the following prerequisites are met:
Installed Python 2.7, Python 3.5, or newer versions
Command-line access with administrative or sudo privileges
Installing Virtual Environment
To create a safe and isolated environment for running Flask without conflicts with other libraries, it is crucial to set up a virtual environment. The steps for installation may vary depending on the operating system.
For Linux (Debian/Ubuntu):
Open the Linux terminal.
Use the apt package manager to install virtualenv on Debian, Ubuntu, and related distributions.
sudo apt install python-virtualenv
For Windows:
Open the command line with administrative privileges.
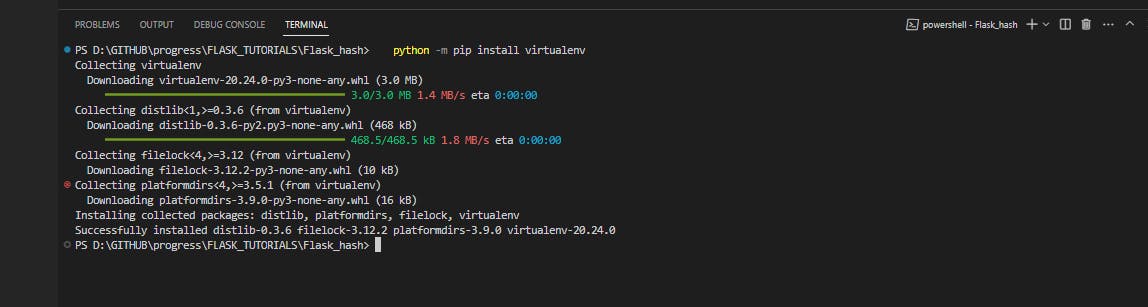
Use pip to install the virtualenv command on Windows.
python -m pip install virtualenv
Now that the virtual environment is installed, let's create a directory where we can set up our Flask project.
Creating a Flask Project Directory
For both Linux and Windows:
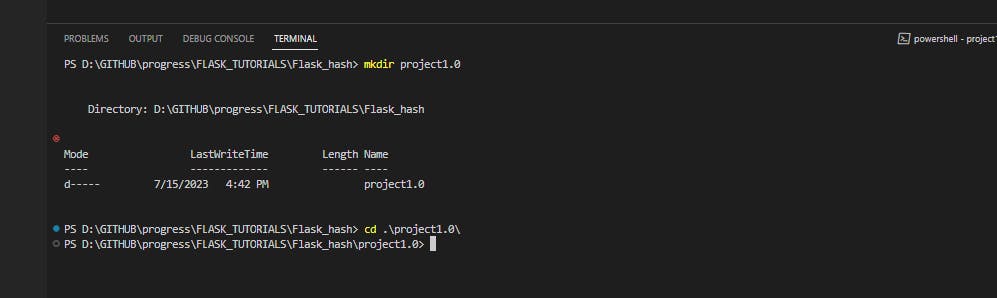
Create the directory
mkdir <directory_name>Move into the directory
cd <directory_name>
Creating the Virtual Environment
Within the project directory, we will create the virtual environment specifically for Flask. This process generates a new folder in the project directory with the environment's name.
A. For Linux (Debian/Ubuntu)
Create the virtual environment
python -m venv <name of environment>
Replace <name of environment> with the desired name for your environment.
B. For Windows
Create the virtual environment:
python -m venv <name of environment>
Replace <name of environment> with the desired name for your environment.
List the folder structure to ensure the virtual environment has been created successfully.
For Windows:
dir
For Linux (Debian/Ubuntu)
ls
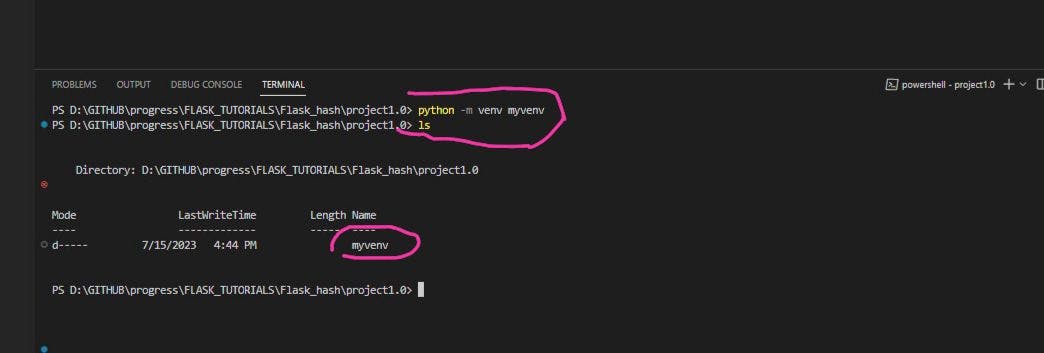
These commands will display the newly created environment in the project directory.
Activating the Virtual Environment
Now that we have the virtual environment created, let's activate it to start using it.
For Linux (Debian/Ubuntu)
.<name of environment>/bin/activate
Replace <name of environment> with the name you assigned to your environment during creation.
For Windows:
Activate the virtual environment using the following command:
<name of environment>\Scripts\activate
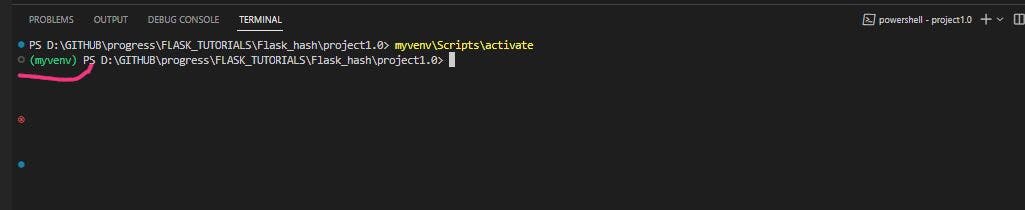
Replace <name of environment> with the name you assigned to your environment during creation
Installing Flask
With the virtual environment activated, we can proceed to install Flask using the following command:
Python -m pip install Flask
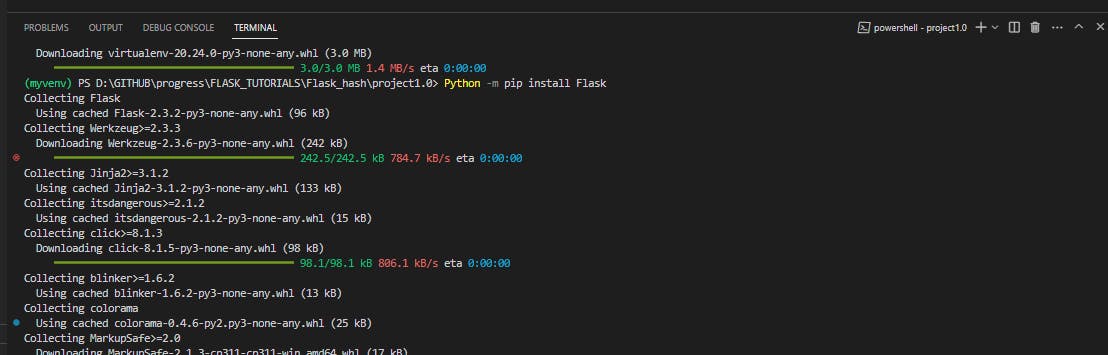
Installing Flask in your virtual environment will provide you with the necessary components to start using the Flask application. It's important to note that the installation of Flask may also include installing additional dependencies required for its proper functioning. Some of these dependencies are:
Werkzeug: Werkzeug is a WSGI (Web Server Gateway Interface) utility library that provides request and response handling functionality. It is used by Flask to handle HTTPWerkzeug: Werkzeug is a WSGI (Web Server Gateway Interface) utility library that provides request and response handling functionality. It is used by Flask to handle HTTP requests and routing. requests and routing.
Jinja2: Jinja2 is a popular template engine for Python. Flask uses Jinja2 for rendering HTML templates and generating dynamic content.
These dependencies are automatically installed when you install Flask using pip. They are necessary for Flask to function properly and provide the required functionality for building web applications.
A simple flask app to display, “Hello, Welcome to Kremlin’s Hasnode.dev blog.”
Now that Flask is successfully installed within our virtual environment, we can proceed to create a basic webpage that will display the following sentence: "Hello, Welcome to the Kremlin's Hasnode. dev blog."
Inside our project directory, let’s create a Python file.
touch app.py
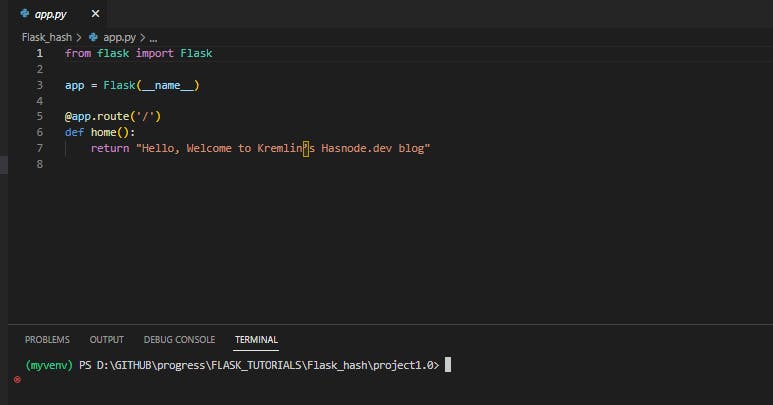
Inside the file, we will input this code:
from flask import Flask

app = Flask(__name__)

@app.route('/')
def home():
    return "Hello, Welcome to Kremlin’s Hasnode.dev blog"
Let’s save the file and close it.
Before we proceed, let's break down the code we just entered step by step to gain a comprehensive understanding of its functionality and purpose.
Line 1: # Import the Flask module
from flask import Flask
In this line, we import the Flask module, which is necessary for creating and running Flask applications. It provides the functionality we need to handle web requests and build our web application.
Line 2: # Create a Flask application instance.
app = Flask(__name__)
We create a Flask application instance called app. This instance will represent our web application. We pass the name as an argument, which is a special variable in Python that represents the current module. It helps Flask locate the resources it needs.
# Define a route and its associated function
@app.route('/')
def home():
    return "Hello, Welcome to Kremlin’s Hasnode.dev blog"
Here, we use the @app.route() decorator to define a route for our web application. The route / corresponds to the root URL of the application. The function home() is associated with this route.
When a user accesses the root URL of our application, Flask will call the home() function. This function simply returns the string "Hello, Welcome to Kremlin’s Hasnode. dev blog", which will be sent as the response to the user's request.
Now that we have a clear understanding of our code's functionality, let's execute the Flask application to observe the outcome of the code we just wrote.
Before we do that, let’s set the FLASK_APP environment variable.
The reason we are doing this is for Flask to easily locate our app.py and run it correctly for us.
To do this, we execute the following command.
For Linux:
export FLASK_APP=app.py
For Windows:
setx FLASK_APP "app.py"
After completing the necessary steps, we can now run the Flask application to observe the results of our code. To do so, we simply execute the command flask run.
Executing the flask run command will initiate the Flask application, and it will indicate that the application is running. Additionally, it will provide us with a URL that we can follow to view the output of our code in a web browser.
For both Windows and Linux
flask run
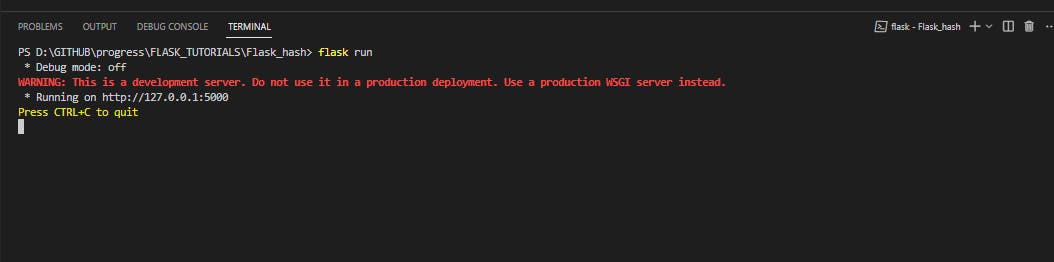
Click on the URL link http://127.0.0.1:5000
If the steps were followed correctly, you should see the following on your screen:
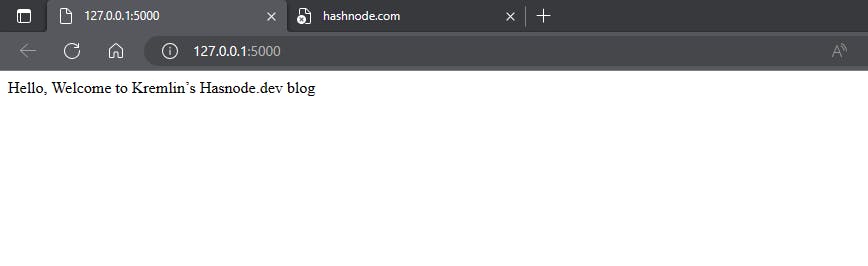
Congratulations! You have successfully run your first Flask application. In our next series, we will delve deeper into the capabilities of Flask by exploring how to render HTML using Jinja templates. Stay tuned for more exciting insights and practical examples!
Key Takeaways:
1. Frameworks provide prebuilt structures and tools to simplify and streamline the process of building software applications.
2. Flask is a lightweight and flexible web framework for building web applications using Python.
3. Flask allows developers to create web applications easily and quickly due to its simplicity and small codebase.
4. Flask follows the Model-View-Controller (MVC) architecture but provides flexibility and does not strictly enforce it.
5. Flask is not tied to a specific database or Object-Relational Mapping (ORM), giving developers the freedom to choose based on their requirements.
6. Installing Flask involves setting up a virtual environment to create an isolated environment for running Flask applications without conflicts.
7. Activation of the virtual environment allows developers to utilize the specific environment and dependencies installed for their Flask project.
8. Running the Flask application is done by executing the flask run command, which starts the application and provides a URL to access it.
9. In the next series, we will explore rendering HTML with Jinja templates in Flask, expanding our capabilities in web development.
Feel free to reach out to me on Twitter at Yaw__Amponsah or via email at yawamp27@gmail.com for any further inquiries or discussions.